"Anno nuovo, vita nuova", dicono.
Chissà se sarà veramente così.
In effetti ci sono alcuni grossi cambiamenti all'orizzonte, per me
di cui però vi parlerò a tempo debito.
Nel frattempo, c'è un'altra IMPORTANTISSIMA considerazione da fare
e cioè che anno nuovo = nuova stagione di Game of Thrones! :-D Yuppii!!!
Con questo felice pensiero in testa, ieri mattina è nato lui
❄❄❄ Spettro ❄❄❄
(sì beh, una mia versione leggermente "edulcorata" del meta-lupo albino con gli occhi rossi di Jon Snow...)
"New year, new life", they say.
Well, maybe it is going to be so indeed.
Actually, there are some big changes on the horizon for me
but it's too early to talk about that now.
In the meantime, there's another VERY IMPORTANT consideration that has to be made
and that's that new year = new Game of Throne season! :-D Yay!!
And with that happy thought in mind, yesterday I made this little fella
❄❄❄ Ghost ❄❄❄
(well, yes, a "cuter" version of Jon Snow's albino direwolf with fire-red eyes...)

Per ora ne ho fatto soltanto una spillina, ma ho intenzione di crearne anche un pupazzetto da tenere sulla scrivania, tanto per non dimenticare mai che "Game of Thrones sta arrivando" (sì ok sono pazza).
For now I've made just this little brooch but I'm going to make a bigger Ghost plushie too
I'll put it on my desk so it'll always remind me that "Game of Thrones is coming" (yes ok I'm crazy).
 Per realizzare una spilla meta-lupo come questa, l'occorrente è:


Chissà se sarà veramente così.
In effetti ci sono alcuni grossi cambiamenti all'orizzonte, per me
di cui però vi parlerò a tempo debito.
Nel frattempo, c'è un'altra IMPORTANTISSIMA considerazione da fare
e cioè che anno nuovo = nuova stagione di Game of Thrones! :-D Yuppii!!!
Con questo felice pensiero in testa, ieri mattina è nato lui
❄❄❄ Spettro ❄❄❄
(sì beh, una mia versione leggermente "edulcorata" del meta-lupo albino con gli occhi rossi di Jon Snow...)
"New year, new life", they say.
Well, maybe it is going to be so indeed.
Actually, there are some big changes on the horizon for me
but it's too early to talk about that now.
In the meantime, there's another VERY IMPORTANT consideration that has to be made
and that's that new year = new Game of Throne season! :-D Yay!!
And with that happy thought in mind, yesterday I made this little fella
❄❄❄ Ghost ❄❄❄
(well, yes, a "cuter" version of Jon Snow's albino direwolf with fire-red eyes...)
Per ora ne ho fatto soltanto una spillina, ma ho intenzione di crearne anche un pupazzetto da tenere sulla scrivania, tanto per non dimenticare mai che "Game of Thrones sta arrivando" (sì ok sono pazza).
For now I've made just this little brooch but I'm going to make a bigger Ghost plushie too
I'll put it on my desk so it'll always remind me that "Game of Thrones is coming" (yes ok I'm crazy).
❄ feltro, nei colori bianco naturale e grigio scuro
❄ filo mouliné grigio chiaro e nero
❄ filo semplice da cucito bianco e grigio scuro
❄ due perline rosse (2 mm, meglio se leggermente cilindriche)
❄ una base per spilla (ma può andar bene anche una semplice spilla da balia)
❄ imbottitura sintetica
❄ ago, spilli e forbici
❄ carta forno, matita e pinzette
❄ carta e stampante per stampare le sagome in fondo a questo post.
To make a direwolf brooch like this, you'll need:
❄ natural white and dark grey felt, 1 mm thick
❄ silver grey and black 6-strand embroidery thread
❄ simple sewing thread, white and dark grey
❄ two red seed beads (2 mm, better if slightly cylindrical)
❄ a bar-pin (a safety pin is ok too)
❄ polyester toy stuffing
❄ needle, pins and scissors
❄ baking paper, pencil and tweezers
❄ paper and printer to print out the templates at the bottom of this post.
PROCEDIMENTO / INSTRUCTIONS
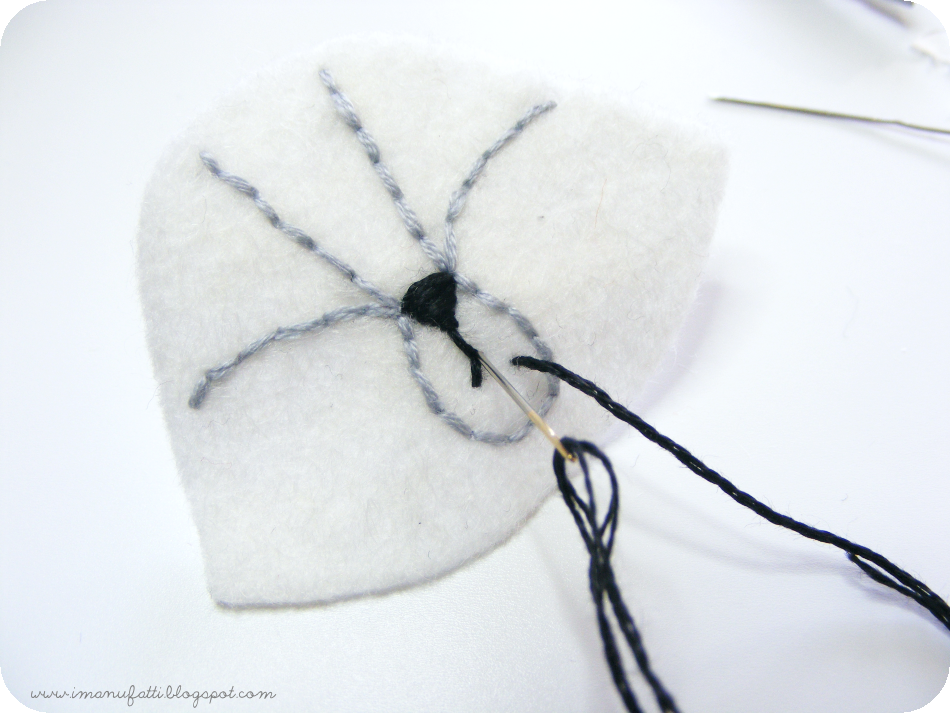
Stampa e ritaglia le sagome in fondo a questo post. Fissa la sagoma della testa sul feltro bianco e ricavane 1x testa. Usa le sagome delle orecchie per ricavare 2x orecchie bianche e 2x interni di orecchie grigio scuro. Su di un pezzetto di carta forno, ricalca la testa di Spettro con i dettagli del muso da ricamare, usando una semplice matita. Ritaglia la testa di carta forno e fissala sulla testa di feltro con uno spillo (falle combaciare il più possibile), quindi ricama i tratti del muso con filo mouliné grigio chiaro diviso a metà (3 fili), a punto indietro.
Print and cut out the templates at the bottom of this post. Pin the head template on white felt and cut out 1x felt head. Use the ears templates to cut out 2x white big ear pieces and 2x dark grey small ear pieces. Trace the head pattern on a piece of baking paper, using a simple pencil. Cut out the baking paper head and pin it on the felt head piece (make the two match). Use silver grey embroidery floss previously separated in half (3 strands) to embroider the head's lines, , using backstitch.
Una volta ricamati i tratti del muso, fai dei piccoli tagli sulla carta forno tutto intorno al ricamo, facendo attenzione a non tagliare nessun punto, quindi strappa delicatamente la carta forno usando delle pinzette.
Make a series of small cuts (be carfeul not to cut the stitches!) to the baking paper and then very gently tear the paper off using tweezers.
Usa il filo nero diviso a metà per ricamare il naso (a punto satin) e la bocca (a punto indietro).
Take a length of black embroidery floss (separated in half) to embroider the nose (satin stitch) and the mouth (back stitch).
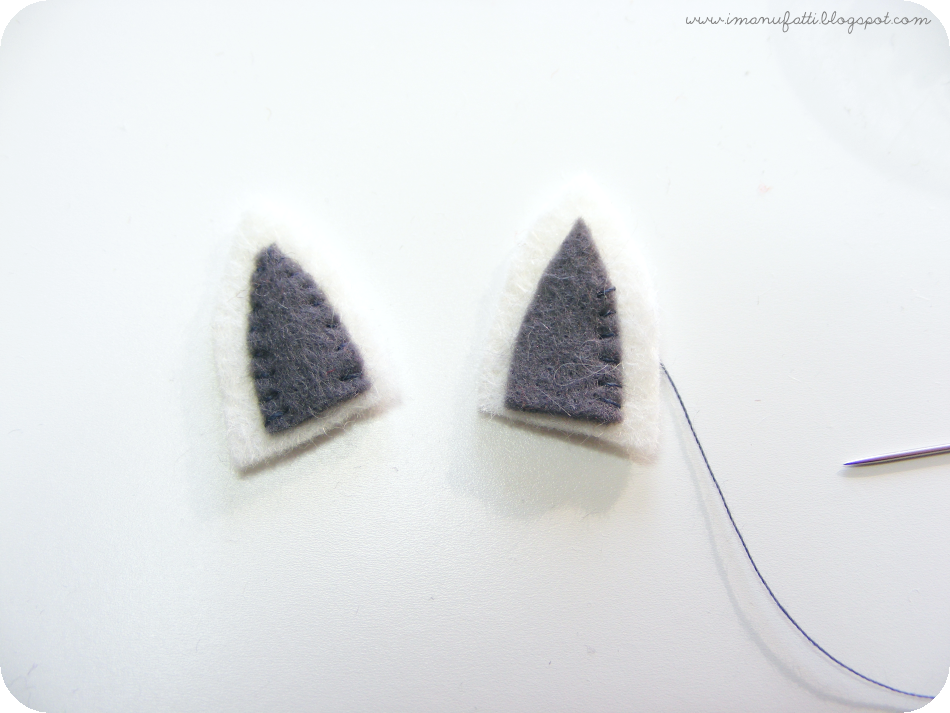
Cuci l'interno grigio scuro delle orecchie, con punto a sopraggitto e filo grigio scuro, su ogni sagoma di orecchio. Usa le orecchie finite come sagome per ricavare altre due orecchie di feltro bianco (cioè il retro di ogni orecchio). Cuci fronte e retro assieme con punto festone e filo bianco.
Whipstitch the twp small dark grey ears to the bigger white ear pieces using dark grey thread. Use these finished ears as templates to cut out the back of each ear, from white felt. Sew back and front ear pieces together using blanket stitch, in white thread.
Fissa la testa su di un pezzo di feltro bianco e ritaglia lungo i bordi, per ricavarne il retro.
Pin the head to some white felt and cut out the back of the brooch.
Su questo, cuci la base per spille (o la spilla da balia), con filo bianco.
Cut the bar-pin (or safety pin) on the back head piece, using white thread.
Cuci assieme fronte e retro partendo dal lato inferiore della testa, con filo bianco, a punto festone. Inserisci le orecchie dopo aver già iniziato a cucire, oppure, se preferisci, fissale prima in posizione con uno spillo (date le dimensioni veramente minuscole, io ho trovato molto più semplice inserire le orecchie man mano che cucivo, e tenerle ferme con le dita).
Sew front and back head pieces together starting from the bottom side of the head. Use white thread and blanket stitch. Insert the ears as you go on sewing or pin them in place before sewing the brooch together (I found it much easier to insert the ears while sewing and hold them in place with my fingers instead of using pins)
Lascia un'apertura di circa 1 cm per inserire l'imbottitura sintetica, quindi richiudi con un nodo sul retro.
Leave a small 1 cm opening to insert some stuffing, then sew up the gap and secure the thread with a knot at the back.
Aggiungi le perline rosse per creare gli occhi di Spettro. Usa filo bianco e cuci ogni perlina da parte a parte, attraverso lo spessore della testa, fissando il filo con un nodo sul retro per ogni occhio.
Add the red beads to make the eyes. Use white thread and poke the needle all the way through the head, pulling the thread ligthly for each eye. Secure the thread with a knot at the back.
Ecco qui, Spettro è pronto :-)
That's it, Ghost is ready :-)
Ora tocca solo mettersi comodi ed aspettare che passi l'inverno... ah, che attesa snervante! ^_^
Now we just have to sit back and wait for winter to be over... ah, such a nerve wracking wait! ^_^
A presto ❤
{apri l'immagine in una nuova scheda/finestra e stampa le sagome mantenendo le dimensioni del file originali!}
{open the image in a new tab/window and print the templates keeping the original file size!}
Per favore, rispetta il mio lavoro e la mia creatività: se vuoi realizzare e pubblicare sul tuo blog un oggetto partendo da questo tutorial, sei gentilmente pregato/a di citarne la fonte con un link a questo post. La vendita di questo tutorial, di oggetti realizzati seguendo questo tutorial e la riproduzione per intero di questo tutorial su un altro sito sono espressamente vietate. Grazie!
Please, respect my work and my creativity: if you want to make an item from my tutorial or to blog about this project, remember to credit me and link back to this post. Do not reproduce my entire tutorial on your site. This tutorial is for non commercial use only. Thank you!