lunedì 19 novembre 2012

Custom orders

Cercando di trovare il tempo per pubblicare un nuovo tutorial gratuito, ecco per adesso la mia ultima fatica su commissione, che mi ha tenuta occupata non poco negli ultimi giorni.
Trying to find the time to post a new free tutorial, here's my latest custom work that kept me quite busy these days.


Il regalo di Natale per un bimbo spagnolo. Spero mamma e papà apprezzeranno.
A baby room ornament for a spanish little boy. Hope mom and dad will like it.

domenica 16 settembre 2012

Halloween.

Non è una festa che sento molto, però le zucche intagliate mi piacciono un sacco. Non potendo (per ovvi motivi, vivendo in un mini appartamento) tenerne una vera in casa, mi sono divertita a creare questa zucca di feltro, a cui ho aggiunto - tanto per cambiare - un amico pennuto: una bella cornacchia paffutella.
I don't feel it much, but I do love pumpkin lanterns. Since I can't keep a real pumpkin lantern in my tiny messy flat, I've decided to make a felted version of it, that can be hanged on a wall or door. Of course I just had to add a feathered friend to it-- a cute puffy crow.


Gli "ingredienti" che vi occorrono per sfornare una zucca come questa sono:
- feltro arancione o giallo intenso, feltro nero e uno scampolo di feltro grigio scuro e bianco
- filo da ricamo arancione
- filo nero di lana grosso
- filo sottile grigio, nero e pesca
- aghi e spilli
- forbici appuntite e affilate
- imbottitura
- carta e matita.
The "ingredients" for this felt pumpkin recipe are:
- orange or golden-yellow felt
- black felt
- a bit of grey and white felt
- orange embroidery thread
- black wool or embroidery thread
- grey, black and peach thread
- needles and pins
- embroidery scissors
- stuffing
- paper and pencil.

1. Prendete spunto dalle foto e schizzate una sagoma di zucca e una cornacchia. Ritagliatele, spillatele al feltro e ricavatene due zucche, due cornacchie, due ali e due occhi di zucca. Dal feltro color pesca ritagliate due cerchietti - le guance - mentre dagli scampoli di feltro grigio ricavatene un becco.
1. Look at the pictures to sketch a pumkin and a crow. With the paper templates, cut out from orange or yellow felt two pumpkins; use black felt to cut two crows, two wings and two pumpkin eyes. Use peach felt to make the cheeks and cut out a beak from grey felt.


2. Prendete gli occhi e fissateli con gli spilli ad una sagoma di zucca. Se volete che la vostra zucca risulti meno "cattiva", cucite gli occhi con il lato tondo verso l'alto. Cucite gli occhi a punto indietro con del filo nero e le guance con filo color pesca con punto sopraggitto.
2. Pin the eyes to the pumpkin. If you want your pumpkin look less "evil", sew the eyes with rounded side up. Use backstitches for the eyes and whipstitches for the cheeks.


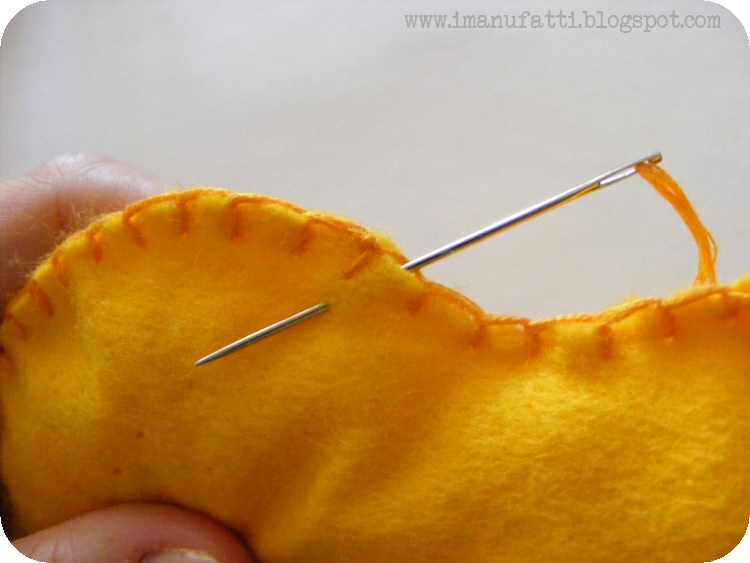
3. Sovrapponete le due sagome di zucca, fissatele con gli spilli e iniziate a cucirle assieme con punto festone partendo dalla sommità della zucca, lasciando una fessura di circa 2cm dal quale infilerete l'imbottitura.
3. Overlap the two layers of pumpkin, pin them together and sew with blanket stitches. Start from the top and leave a 2cm gap to insert the stuffing.


4. Una volta imbottita la zucca ben bene, chiudete lo spazio lasciato aperto e "trapuntate" partendo dall'alto verso il basso, seguendo la forma della zucca, delle linee con punto indietro, come nella foto. Passate sotto alle guance e agli occhi e fate partire le linee dall'interno della zucca, per nascondere il nodo.
4. Stuff your pumpkin and close the gap. "Quilt" the pumpkin with backstitches top down, following the shape of the pumpkin. Sew three or four lines, as shown. Sew under the eyes and the cheeks and start from the inside of the pumpkin, to hide the knot.


5. Cucite la bocca con grandi punti indietro partendo da sotto una guancia.
5. Sew the mouth with big backstitches, starting from under one cheek.


6. Spillate le due sagome di ala e cucite a punto indietro con del filo grigio.
6. Pin the two wings and sew with grey thread using backstitches.


7. Ritagliate un piccolissimo cerchio di feltro bianco per l'occhio e cuciteci una pupilla con il filo di lana nero.
7. Cut out a tiny circle of white felt for the eye and sew a little pupil with black wool thread. 


8. Spillate il becco sulla sagoma posteriore della cornacchia; sovrapponete le due sagome di cornacchia e fissatele alla zucca con degli spilli. Cucite con filo nero partendo dalla schiena della cornacchia. Lasciate come sempre un'apertura di circa 2cm per inserire l'imbottitura. Non dimenticate di togliere lo spillo una volta cucito il becco!
8. Pin the beak on the back side of the crow; overlap the two layers and pin the crow on the pumpkin. Sew with black thread starting from the top of the crow. Leave a 2cm gap and insert the stuffing. Remeber to remove the pin from the beak after sewing it!


9. Una volta imbottita la cornacchia, cucite l'ala ripassando su alcuni punti con lo stesso filo grigio. In questo modo l'ala resterà leggermente alzata, per un maggior risalto.
9. After stuffing your crow, sew the wing over some of the stitches with the same grey thread. This way the wing will stay up a bit and be more visible.


10. Con il filo di lana nero, cucite sul retro della cornacchia un piccolo occhiello nascosto.
10. Use black wool thread to sew a hidden loop on the back of the crow.


FATTO! Buon Halloween!
DONE! Happy Halloween!


venerdì 17 agosto 2012

Come fare una spilla di feltro a forma di fiore

Se c'è un oggetto di feltro che va alla stragrande, ho notato, sono le spille. Pare proprio che ogni feltromane che si rispetti abbia creato almeno una spilla nella vita. Potevo io essere da meno? E visto che oggi mi sento generosa, ci ho fatto pure un tutorial :D le foto sono un po' mosse ma fa niente :D
Felted brooches seem to be very popular lately and every felt-addict crafter seems to have done at least one in life. So, not to be outdone, here are my personal brooches :D and because I feel generous today, here's their tutorial, too :D sorry for the blurry pics :D


Allora, l'occorrente per creare questa spilla fiorellosa è:
- feltro (dei colori che preferite)
- perline
- ago e filo di cotone grosso o da ricamo e filo sottile
- bottone
- imbottitura sintetica
- spilla da balia o di quelle fatte apposta per esser cucite
- carta e penna
- forbici appuntite e affilate.
So, all you need is:
- felt (you pick the colours)
- little beads
- needle, embroidery and simple polyester thread
- a button
- some polyfill
- brooch clasp
- paper and pen
- sharp scissors

1. Disegnate su di un foglio la forma del fiore a 8 petali, una più grande per la base e una più piccola per il centro.
1. Sketch two flowers, both with eight petals, one bigger and one smaller.

2. Ritagliate le sagome di carta e fissatele al feltro con gli spilli, quindi ritagliate un fiore centrale (marrone) e un fiore-base (rosso).
2. With the paper templates, cut-out a smaller flower from brown felt and a bigger flower from red felt.


3. Sul fiore rosso, cucite la spilla.
3. Sew the brooch clasp on red flower.


4. Fissate il fiore rosso con la spilla su dell'altro feltro rosso e fissate con gli spilli, quindi ritagliate un altro fiore-base. In questo modo le due sagome di fiore saranno perfettamente combacianti, cosa che di solito non è - almeno per quanto mi riguarda - quando si ritagliano direttamente due sagome di feltro dalla sagoma di carta (a me vengono fuori sempre un po' diverse, mannaggia).
4. Use the red flower with brooch clasp as template to cut out a second red flower. This way the borders will match perfectly (I never get to cut out from a paper template two identical pieces of felt :P so this is the best way for me).


5. A meno che non abbiate la mano più ferma e precisa del mondo, i vostri petali saranno un po' diversi l'uno dall'altro, quindi segnate con uno spillo il lato combaciante dei due fiori-base che avete ritagliato, così saprete come sovrapporli quando andrete a cucirli assieme.
5. If you see (like I did) your petals are all different one from the other, use a pin to mark the matching sides of the flowers, so you'll know how to overlap them when you'll have to sew them together.


6. Posizionate il fiore centrale e il bottone sul fiore-base (quello senza spilla), e cucite.
6. Place the brown flower and the button in the middle of this second red flower and sew.


7. Una volta fissato il bottone, con del filo bianco cucite sul fiore marrone tanti punti lunghi per creare gli stami del fiore, partendo da sotto il bottone verso l'esterno. I punti lunghi devono essere 2 per petalo.
7. Sew two long stitches of white embroidery thread per petal, starting from under the button as shown.


8. Cucite le perline tra i due punti di filo bianco, stavolta con del filo sottile (meglio se di polyestere, è più resistente).
8. Sew a white bead in between every white stitch. Use a simple thin thread (better if polyester).


9. Sovrapponete le due sagome di fiore-base (che grazie allo spillo-segna-verso saranno perfettamente combacianti :D), fissatele assieme con degli spilli e iniziate a cucire partendo dall'interno del fiore, per nascondere il nodo.
9. Overlap the two red flowers (petals will match thanks to the pin marker :D), pin them together and start sewing from the inside, to hide the knot.


10. Cucite come in figura e fermatevi all'ultimo petalo; da qui infilerete l'imbottitura.
10. Sew as shown; leave the last petal open to insert the stuffing.


11. Imbottite leggermente il fiore premendo l'imbottitura verso i petali con una matita (io uso il manico di un pennello), quindi chiudete con gli ultimi punti e un piccolo nodo sul retro.
11. Stuff your flower lightly, pushing the polyfill into the petal with a pencil (I use the handle of a brush), then sew to the end and close with a little knot on the back.


TA-DA! La vostra spilla fiorellosa è pronta per essere indossata. :)
TA-DA! Your flower brooch is ready to be worn :)


Per favore, rispettate il mio lavoro e la mia creatività: se volete realizzare e pubblicare sul vostro blog una spilla partendo da questo tutorial, siete gentilmente pregati di citarne la fonte con un link a questo post. La vendita di questo tutorial, di spille realizzate seguendo questo tutorial  e la riproduzione per intero di questo tutorial su un altro sito sono espressamente vietate. Grazie!
Please, respect my work and my creativity: if you want to make a brooch from my tutorial or to blog about this project, remember to credit me and link back to this post. Do not reproduce my entire tutorial on your site. This tutorial is for non commercial use only. Thank you!

sabato 14 luglio 2012

www.etsy.com/shop/iManuFatti

ERA ORA! Da quanto tempo ne parlavo? Troppo!
Sono fiera di annunciare ufficialmente che il mio negozietto Etsy tanto agognato è finalmente APERTO! Ci sono tutte le cosine (poche per ora) a cui ho lavorato segretamente in questi mesi e accennato in qualche post qui sul blog, come le galline di benvenuto:
It was about time! I have talked about this for ages, and now I'm proud to announce that my little Etsy shop is finally open! There are all of the things (not many for now) I've been secretly working on during these months, like the welcome bunting hens:


i gufetti miei adorati
my loving owls


e poi fiori e uccellini, a cui presto si uniranno tanti altri soggetti tra i più vari, sempre ispirati dalle cose che amo di più :) Ho la testa così piena di idee che prima o poi scoppia :)
flowers and birdies and many more coming, all inspired by the things I love the most :) My head is full of ideas I feel like it's about to explode :)

sabato 16 giugno 2012

Ghirlanda estiva con papaveri

Il tempo è letteralmente VOLATO in queste ultime settimane, ed eccoci qui, siamo già a giugno inoltrato e l'estate è alle porte! *_* Sto trascurando un po' il blog perché sono - ancora e ancora - in mezzo ai preparativi per aprire 'sto benedetto negozietto su Etsy. Ma per fortuna ci siamo quasi, è questione di giorni ormai (da quanto tempo lo sto dicendo?)
Ma oltre ai lavoretti da mettere in vendita, in un'oretta scarsa ieri sera ho ideato e creato questa ghirlanda feltrosa con papaveri, come regalo di compleanno per la mamma di un amico.
Time flies, weeks passed in a snap, and here we are, it's summer next week! *_* I'm neglecting the blog a bit, but I'm [still] working on my Etsy shop, which I'll finally open very soon... It's a matter of days now!
Beyond the felty things for the shop, yesterday in less than an hour I've managed to do this pretty summer wreath with felt poppies; a birtday present for a friend's mom.


Mi piace regalare cose fatte da me. A parte il fatto che con i regali handmade si evita il fastidio di andar per negozi a cercare qualcosa di originale (è più facile trovare un ago in un pagliaio!), un regalo handmade è sempre apprezzato molto di più di qualsiasi cosa bell'e pronta presa dallo scaffale di un negozio, perché è un oggetto unico e veramente personale creato apposta per la persona che lo riceve.
I love handmade gifts. They are unique and truly personal, always much more appreciated than anything you can buy in a shop. Plus, you don't have to storm a thousand shops in desperate search of something nice and original (it's easier to find a needle in a haystack!).


Ci sono un milione di versioni di papaveri di feltro in rete; io però sono "andata alla fonte", diciamo così, e ho preso spunto da un papavero vero, riadattandolo un po' per "esigenze estetiche" (il papavero ha infatti solo quattro petali). I materiali sono veramente super economici: due vecchi bottoncini bianchi, un po' di feltro rosso e nero, qualche pseudo spiga (non so come chiamarle) di quelle che si trovano nei negozi fai da te o dai fiorai e un po' di rafia, tutto incollato a caldo su una ghirlanda di vimini, anche questa presa in un bricocenter. Il minimo sforzo per un risultato che spero sarà apprezzato :)
Poppies are a quite common subject for every crafter; there are millions of different designs of this lovely flower on the Internet but for my poppies I looked at the real flower to find the right inspiration. I have though made some adjustment for "aesthetic purpose" (as a matter of fact, poppies have only four petals). The materials used for this wreath are really super-cheap: a bit of red and black felt, two old white buttons, a bunch of wheat ears or similar, some raffia and a wicker wreath. A nice result with the minimum effort :)

domenica 13 maggio 2012

Happy mother's day

Di solito non festeggio questo tipo di giornate - della mamma, del papà, degli innamorati... non so, per me sanno un po' troppo di consumismo e ipocrisia. Questo non vuol dire che non mi piaccia fare regali ai miei genitori o a chi amo, anzi; quindi per quest'anno mi adeguo alla massa e per festeggiare la mia mamma ecco qui questo mazzo di tulipani (come quelli del post precedente) che ho fatto stamattina per lei.


Per rendere più realistici i miei tulipani per la mamma, ho voluto creare un effetto rosa sfumato, e l'ho fatto semplicemente picchiettando dell'acquarello fucsia molto molto diluito sul feltro bianco con un pennello a zoccolo alla base del fiore. Semplice ma d'effetto, come piace a me :)
Buona festa della mamma a tutte!